

Welcome to this tutorial on how to flash your Samsung Galaxy Phone or any device. Basically Required for Flash tool. This is computer software called “Odin” and Also, Same as the Odin3 flash tool.
Brief table of Contents
That can download using this link (Odin Download 3.14.1 Latest Version) and We provide you with upgrade firmware that can be compared to the update Samsung releases. Should we no data loss, however, we always recommend you to back-up your data using something Smart Switch.
If you’re not a 100% sure about manually updating your phone we always advise you to go to you fish away using Samsung Smart Switch or over-the-air. Also, You can Follow How to use Samsung Smart Switch for Flash Samsung Phons.
So, Let’s start the process.
Required for ROM flashing:
» A computer that is plugged into a power source
» Take a USB cable for connecting the phone
» Galaxy Device, with at least 50% charge in the battery
» Download Firmware and Odin flash tool
Download Samsung Stock Firmware
The first step is to go to Download Samsung Firmware where you can click on our homepage firmware to find out what model number your phone is, you can check it on your device when you go to settings, about the
the advice there you’ll find the model number that you have to type into the firmwarehome.com Homepage search engine.
What will come up next is a list of the firmware. Notice that there are a different release Android versions and region. We recommend you to pick a firmware to fit your region as it might be optimized for your carrier. You will see a summary of the firmware. Freely can download with a faster speed for your convenience.
We recommend you to download the file to your desktop. Once downloaded you can extract the file with an archiver.
Follow Odin Flash Steps
Time needed: 10 minutes
Odin flashing process for any Samsung device. Now you have Stock firmware, Install USB driver, and Odin in your windows computer. Let’s follow the steps,
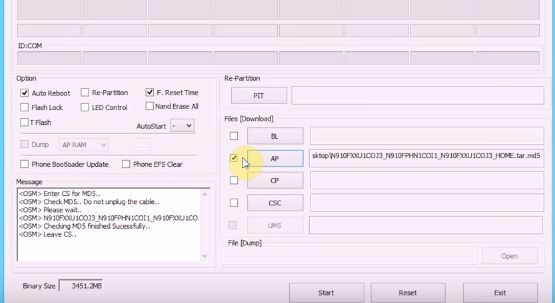
- The next step is to fire up Odin (Odin3 v3.14.1) on the computer.
“odin.exe” file double click and open Odin software window

- Click on AP Button and select the firmware you downloaded.
It might again take some time for Odin to recognize your firmware.

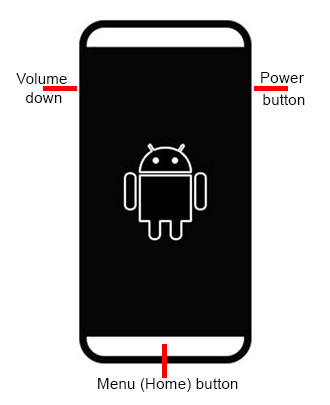
- You can now power off your device and boot it into a special mode call as download mode (Odin mode)
Therefore we want to press the volume down + menu button and the power button simultaneously.

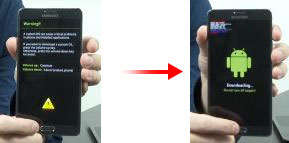
- After you will see a warning screen and you can press volume up to continue.
You can see below picture about that. We can now connect it to your computer.

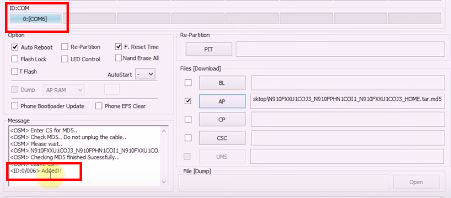
This picture shows the Galaxy Note 4 phone, Result of Volume down+menu+power button and after step - Odin will give the message added when the recognize the phone.

- So, you can now click start to begin the flashing progress.
Once the process started do not unplug your phone from the computer or the computer from the power source.
Now Flash begins. Flashings will take time. It’s also normal for the phone to reboot a couple of times during the progress.
- So, Once Odin displays the pass we can disconnect your phone.
The device will be restart after a successful process.

On your phone, you can go back to settings, about the device and you will see that it has updated.


Thanks for following this tutorial, see you next time.
Great, I really like it! You’re awesome
Thank you for your excellent service
This is impressive. Keep it up.